While it may seem like a big deal today, as to what computer you are using to surf the web or doing most tasks one does with a computer, almost any computer will work. Mac or PC, new/faster older/slower eventually you will get the job done.
If you are a photographer, professional or hobbyist, just about any computer can get the job done. There is one thing that may not be apparent though, the monitor you are using to adjust your photos color and white balance can make a big difference as to what you are printing or sending to the web for others to see. Not so much the type of monitor, but calibration of any monitor, PC or MAC.
You can be using the newest LED monitor or a back lit LCD screen or even an older cathode ray tube monitor, what is important is that you calibrate your monitor so that you know what you are adjusting on your screen, and looks good to you is what everyone else is seeing, your are adjusting with a standard that will look good on the web or print good when sent to a photo lab or printer.
Imagine if every car's speedometer on the road was not calibrated, one person may think he is driving 45 mph and another person next to him driving the same speed is seeing 55 mph. Who is right, well if we have calibrated speedometers at least fairly close to each other, we are all driving to a standard. The same is true of colors on computer monitors.
Many monitors and laptops on the market tend to have more of a blue tint to them, so people who edit photos with these will tend to publish photos to the web that may appear overly saturated with red or their contrast seems to high when printing.
Have you ever taken your shots that looked great on your computer and loaded them into the photo kiosk machine only to find the prints look awful. There are a couple possibilities, the photo machine and printer at the store is off or your photos are off.
| ColorMunki Display Calibrator |
There are a number of hardware calibrators out on the market.One popular one that I have had success with ColorMunki Display calibrator. This a simple device that plugs into you USB port and will sit against your monitor screen and run a series of color tests and create a color profile for your monitor, readjusting your monitor slightly so the colors and intensity you see on your screen is at an industry standard and when you send your photos to be printed or uploaded to the web, they are actually how you saw them after editing in the digital dark room. Whether you use Photoshop, Lightroom, Digital Photo Professional, Aperture, Paintshop Pro or what ever your favorite photo editing software is, working with a calibrated monitor can make all the difference between saving bad images, OK images or stunning images.
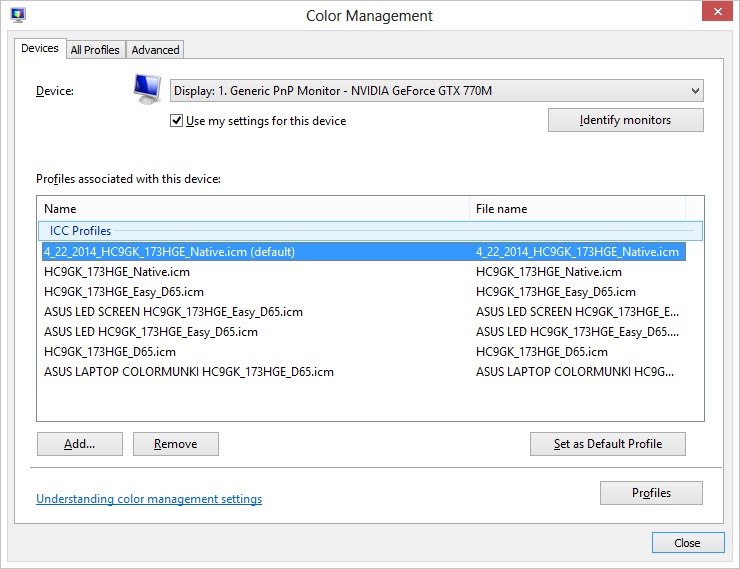
TIP: Once you have followed all the steps you will be prompted to save the new color profile. I am running Windows 8. On occasion my display profile would revert back to the original system default which was a little on the blue side. I would then have to reboot. I am not sure why this would happen, but upon doing a lot of internet searching I found this tip that makes this occurrence much less frequent.This should be very similar for people running other versions of Windows also.
Open your computers control panel. Select Color Management
Remember that file name you used to save your new ColorMunki color profile and set it as the new system default.
You may never experience the problem I have encountered, but if you do, try this and it may make the computer rolling back to the system default color profile less frequent if at all. Good luck.
To the average person that is not into photography, this isn't a big deal, but to us photographers, color calibration is important.
Here is a LINK to ColorMunki Display by X-Rite for more info on this product.


No comments:
Post a Comment